The XOR test verifies the checksum over a drive set. For example, if you have a set of 3 drives it calculates
Drive1_Sector0 XOR Drive2_Sector0 XOR Drive3_Sector0
Drive1_Sector1 XOR Drive2_Sector1 XOR Drive3_Sector1
:
Drive1_SectorLast XOR Drive2_SectorLast XOR Drive3_SectorLast
The checksum must be 0 if the given drive set is a RAID-5.
Clicking Tools->XOR test brings up a window that allows you to perform some tests on a given set of drives.
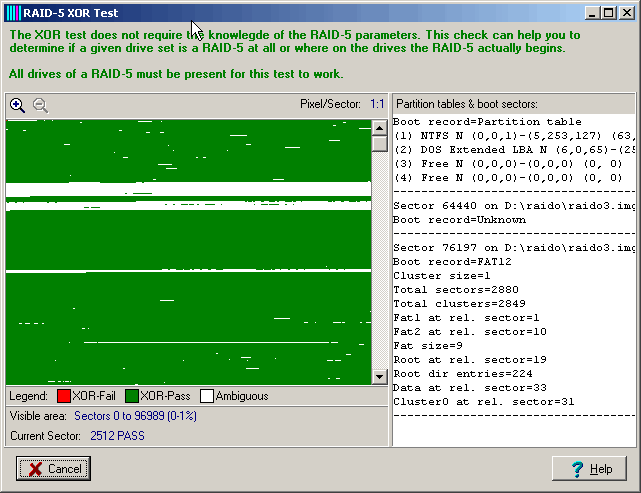
Click on the Start button and after some seconds you will see a window similar to this:

Each sector is represented by one pixel.
The "Visible area" field tells you the region on the drives you are currently looking at. The first pixel in the top left position represents the checksum of sector 0 over all three drives. The last pixel in the bottom right position represents the checksum of sector 96989 over all three drives. The percentage (0-1%) indicates the location of the visible area within the whole scope of the drives. If you wish to inspect another area you can scroll the window by clicking on the vertical scrollbar.
Each sector is colored in one of three possible ways:
: the checksum of XOR over all drives is not 0 for this sector. This sector does not meet the requirements of RAID-5.
: the checksum of XOR over all drives is 0 for this sector. This sector meets the requirements of RAID-5. In addition, the sectors involved are non-trivial (non-zero), therefore this is a very strong indication that this sector indeed belongs to a RAID-5.
: the checksum of XOR over all drives is 0 for this sector and therefore meets the requirements of RAID-5. However, the sectors involved are trivial, meaning they contain zeros only. The XOR checksums of zero-sectors are zeros. Therefore, sectors marked as ambiguous should be seen in context.
When moving the mouse over the graphic, the field "Current sector" indicates the corresponding sector number and its XOR value.
It is possible to zoom in the picture. Just click on ![]() .
To zoom out click on
.
To zoom out click on ![]() . The "Pixel/Sector"
value to the right of these icons tell you the current magnification.
. The "Pixel/Sector"
value to the right of these icons tell you the current magnification.
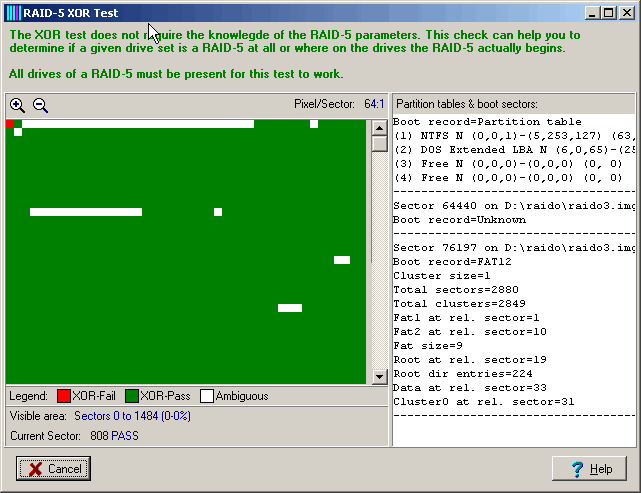
The picture above proves that the drive set in question is indeed a RAID-5 array, probably beginning at sector 0. Let's inspect the beginning of the RAID in greater detail. Click on Zoom-in seven times until the pixel/sector ratio is 64:1.

You can see that there is just one sector failing the XOR test, sector 0 that usually contains the partition table. You might be tempted to set the "Start sector of the RAID" (in the main screen) to 1, but there are two reasons to set it to 0: First, it's a hardware RAID we are looking at and hardware RAIDs usually do not store administrative information on the drive but on the controller card. Second, 1 would be an unusual number. In software RAIDs you normally have multiples of 63 which is the number of sectors per track. Windows' "Dynamic Disk" RAIDs begin at sector 63. Other software RAIDs might have a whole partition containing administrative information and the RAID area beginning after that.
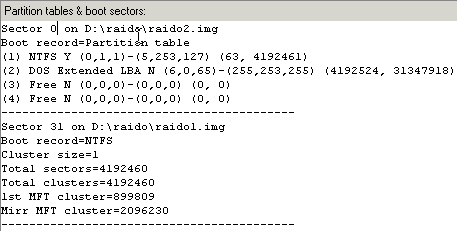
This window displays all sectors that have a boot signature (0xAA55) at offset 510. If the sector in question contains a valid partition table or boot sector its content is displayed.

In the example above you see:
A partition table found at sector 0 on image d:\raido\raido2.img. It contains an NTFS partition pointing to sector 63
A NTFS boot record at sector 31 on image d:\raido\raido1.img.
Obviously, the NTFS boot sector is the one described by the partition table. It is found on another drive at sector 31 instead of 63. This is a strong indication that these sectors are already part of a RAID-5, with a block size of 32 sectors or below.
See also: